


Easy Macrame Hanging Planters
Months ago, while I was very pregnant and putting the finishing touches on Lillian’s nursery, I decided I was going to try my hand at macrame hanging planters. After searching around on Google and Pinterest, I still couldn’t find the kind of simple tutorial I was in need of. I found a lot of great ones for planters that were really cool but not that beginner friendly. Also found a whole bunch of tutorials for planters made out of cut up t-shirts, which looked great too and allows for so many color options. But I wanted something like a modern twist on classic macrame. I had to toggle back and forth between screens to piece together the info I needed. So I decided to just take pictures as I worked and create my own easy macrame hanging planter tutorials.
Today, I’m going to show you the 2 basic knots I used to make my 2 hanging planters. They look so much more intricate than they really are. So yes, YOU TOO can make macrame hanging planters for your own jungalow enjoyment!

Materials needed. All from hardware store. Found this AMAZINGLY perfect pink and white braided polyester rope 3/16″ x 50 feet. *My planters are designed to fit standard 4″ diameter clay pot.
Macrame Hanging Planter #1 – Half Square Knot
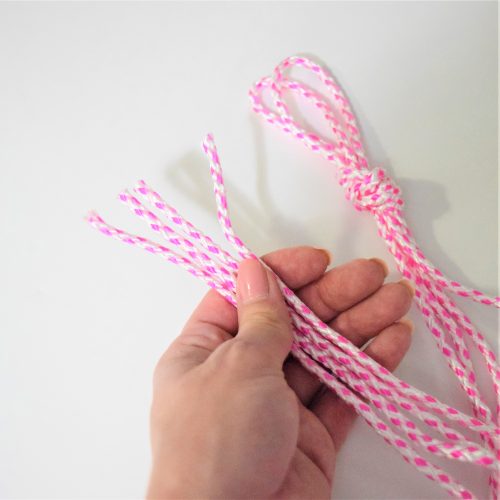
Fold rope into 4 equal sections. Knot the side that does not have the rope ends., to create the loop it will hang from. Cut other side to have 4 rope ends.

I removed a picture from the wall and hung my top loop from the nail so I could work easier. Later you’ll see i ended up adding a piece of painters tape to secure it better.

First knot, a half square. It’s the same simple knot you use to tie your shoes, except there are 2 “stationary cords” INSIDE your knot. *NOTE that the left “working cord” is going BEHIND the stationary cords and right working cord is going in FRONT.

Pull tight to top. That’s it! A half square knot. Repeat EXACTLY what you just did with the same working cords going in front and behind each time.

Soon the knots will start to spiral up into this super cool helix shape!

Continue the spiral for about 6-8 inches. Drop down about 8-10 inches and knot 2 cords together twice and repeat with other 2 cords.

Repeat last step, BUT knot opposite 2 cords twice and other 2 opposites. Drop down 4-5 inches and repeat. Knotting opposite cords again. Another few inches and repeat. This will create the cris-crossing that holds the pot.
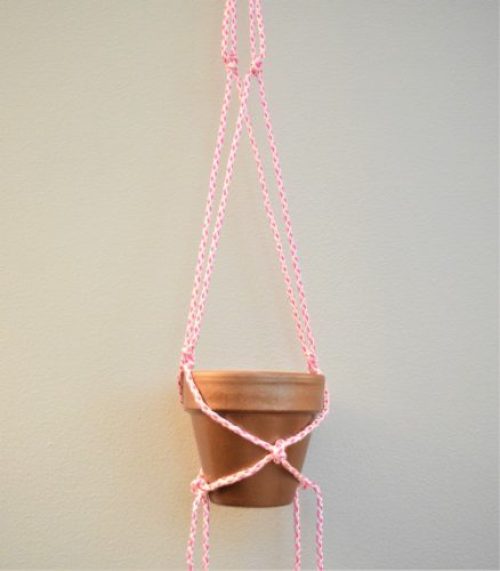
Now time to try your pot. Starting to look like a real planter! Here we can see how the pot sits inside the cris-cross knots we made and make any adjustments necessary.

When satisfied with the fit of the pot. Double knot cords underneath.

Okay I did a quadruple knot. Continue your half square knotting to create spiral at bottom of hanging planter.

When desired total length of planter is reached. Knot all 4 cords again to finish and trim them to equal length.


Macrame Hanging Planter #2 – Square Knot

For this one I wanted more cords to work with. Start same as above, but fold rope into 8 equal sections. Tie one end and snip ends of the other.

Take 4 cords on left and do half square knot. Same as above. Pull tight to top.

Now to make the other half of the square knot. Take your working cords and REVERSE which was in front and which was in back. Thus balancing each side to make the full square knot.

Repeat these to knots making sure to switch back and front cords each time. They should create this cool boxy shape. If you do the same side twice, you’ll notice the cords twisting a bit like the half square knot.

Repeat with remaining 4 cords on other side.

After several inches, I exchanged 2 working cords on each side to be the new stationary cords in front and back square knots. *This also helped to balance out the working and stationary cords lengths given the working cords were getting much shorter.

Drop down 8-10 inches and make 4 double knots with the 8 cords.

Try to knot the ones hanging closest to each other.

Drop down another 4-5 inches and make 4 new double knots using 2 new adjacent cords. Repeat again to make the cris-crossing.

Try your pot inside the planter. WOW this is looking gorgeous!

Make adjustments to knot lengths if necessary and tie all 8 cords together underneath pot. Continue side by side square knots. I secured the bottom with a gathering knot seen here:

You can also just tie a regular knot.
Hooray! See how easy that was! Now just put your plants in the pots and inside they’re new home and hang in your space! *Remember south and east facing windows will usually get the most bright/direct light. Succulents would probably prefer a north or west facing window.


The plants have been moved around since I took my original pics 8 months ago, so I snapped a few more pics of what’s currently hanging in the nursery. Between these and her wall shelf, I’m going to keep as many out-of-reach plants in her room as possible to improve the air quality for little Lillian.
I actually bought more cord and already want to make a couple more macrame hanging planters for my kitchen. Maybe I’ll try another new knot or two and do a follow up tutorial?!


Loving this! Might actually give it a go! To be continued…ha!
Now I need to get some plants to hang! Such a fun DIY!
Wow! That’s impressive. I do not think I’m that handy to get that done haha but looks great chica!